We would like to keep track of the weather while on the move. Of course we could have just bought a regular weather station and mounted it somewhere in Molly. But we took a different approach, which involved a number of environment sensors, a Raspberry Pi and a little programming. The end result was great.
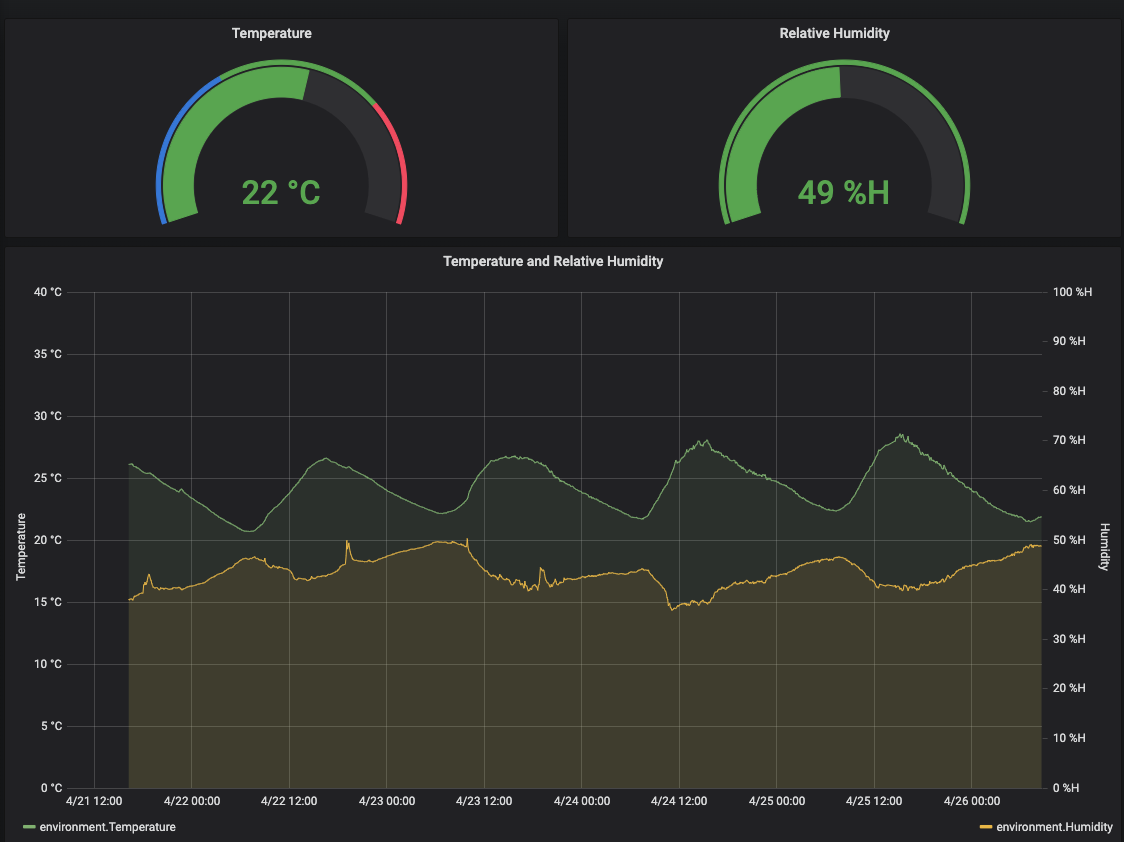
Of course it is good know what the current weather is, but it would also be nice to go back in time and know what the weather was on a particular day. And then cross reference this with where we were at that time. Turns out this is all possible.
The Sensors
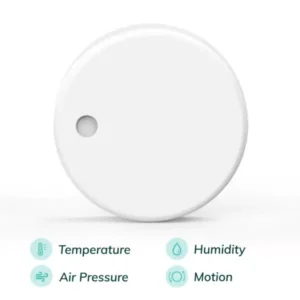
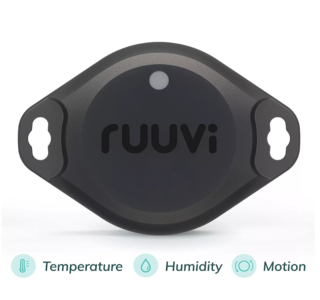
Our little weather station is powered by sensors from Ruuvi. We monitor inside locations with the 4 in 1 Ruuvitag sensor and outside locations with the 3 in 1 Ruuvitag pro sensor. No plans to add light or wind sensors.
The 4 in 1 tag can monitor temperature, humidity, pressure and motion. While the 3 in 1 is waterproof, but only measures temperature, humidity and motion. No pressure. All use bluetooth connections back to the computer.
Installation of Ruuvitag Software
It took a bit of effort to get the computer to talk to the sensors. The following steps are based on this guide.
Step 1 : Make sure the packages in the raspberry pi were the latest version
$ sudo apt update
$ sudo apt-get dist-upgrade
Step 2 : Make sure the bluetooth radio exists
$ hcitool devStep 3 : Install the packages for the bluetooth
$ sudo apt-get install bluez-hcidumpStep 4 : Install the packages for Ruuvitag
$ sudo pip3 install --upgrade setuptools
$ python3 -m pip install --user ruuvitag_sensor
Step 5 : Make sure the python package is running by confirming the help screen is displayed
$ python3 -m ruuvitag_sensor --helpStep 6: Find the Ruuvitag/s with
$ python3 -m ruuvitag_sensor -fThe output shows lots of bluetooth traffic, but hidden in all the noise is the MAC address of the Ruuvitags and of course all the measurements:
{'data_format': 5, 'humidity': 58.1, 'temperature': 15.43, 'pressure': 999.92, 'acceleration': 1012.4820986071803, 'acceleration_x': -24, 'acceleration_y': 20, 'acceleration_z': 1012, 'tx_power': 4, 'battery': 3161, 'movement_counter': 97, 'measurement_sequence_number': 2894, 'mac': 'c7bba2c30dd9', 'rssi': -75}MQTT
The code samples provided demonstrated how measurements could be posted to mqtt. This example is based on Paho MQTT, which was installed with a single commannd
$ pip3 install --user paho-mqttAnd then magically measurements were being passed with the sample program to the mqtt broker with the following command
$ python3 post_to_mqtt.py --mac C7:BB:A2:C3:0D:D9 -b 192.168.0.76 -t ruuvitag -i 10 -l mollyNote: MQTT is not proving to be completely reliable. If the network fails, then MQTT fails. So, may need to change this to a connectionless protocol, like HTTP Post.

Sensor Specifications
Indoor Sensor Specifications
Temperature
Probe Operating Range: (-40°C to 125°C)
Accuracy: ±0.2°C (5°C to 60°C)
Resolution: 0.01°C (typical)
Response time: 5 seconds
Relative Humidity
Probe operating range: 0 to 100 %RH
Accuracy: ±2% (20% to 80% RH at 25 °C)
Resolution: 0.01 %RH
Atmospheric (Barometric) Pressure
Typical absolute accuracy: ±1 hPa
Relative accuracy: ±0,06 hPa
Output resolution: ±0,002 hPa
Motion
3-axis, ±2 g / ±4 g / ±8 g / ±16 g @ 1…5300 Hz
Enclosure
IP67 – Complete protection against ingress of dust and airborne particles. Protection against water and liquids, up to and including immersion in up to one meter of water.
Outdoor Sensor Specifications
Temperature
Probe Operating Range: (-55°C to 150°C)
Accuracy: ±0.1°C (-20°C to 50°C)
Resolution: 0.0078°C (typical)
Response time: 5 seconds
Relative Humidity
Probe operating range: 0 to 100 %RH
Accuracy: ±2% (20% to 80% RH at 25 °C)
Resolution: 0.01 %RH
Motion
3-axis, ±2 g / ±4 g / ±8 g / ±16 g @ 1…5300 Hz
Enclosure
IP68 – Complete protection against ingress of dust and airborne particles. Protection against water and liquids in up to 1.5 meters of water for 30 minutes..
Making it Work
Initially we only purchased one ruuvi sensor, just to make sure we could make it work. Everything worked fine with the first sensor. However, once we added more sensors, the initial software test, as described above, did not work very well. After several hours of good operation, the software would eventually crash.
Turns out, the sample post_to_mqtt.py software we were using only supports a single sensor, and running multiple versions of the same software concurrently causes conflicts with reading the bluetooth interface. So, the software had to be modified to support multiple sensors in a single thread. The final code is available here.
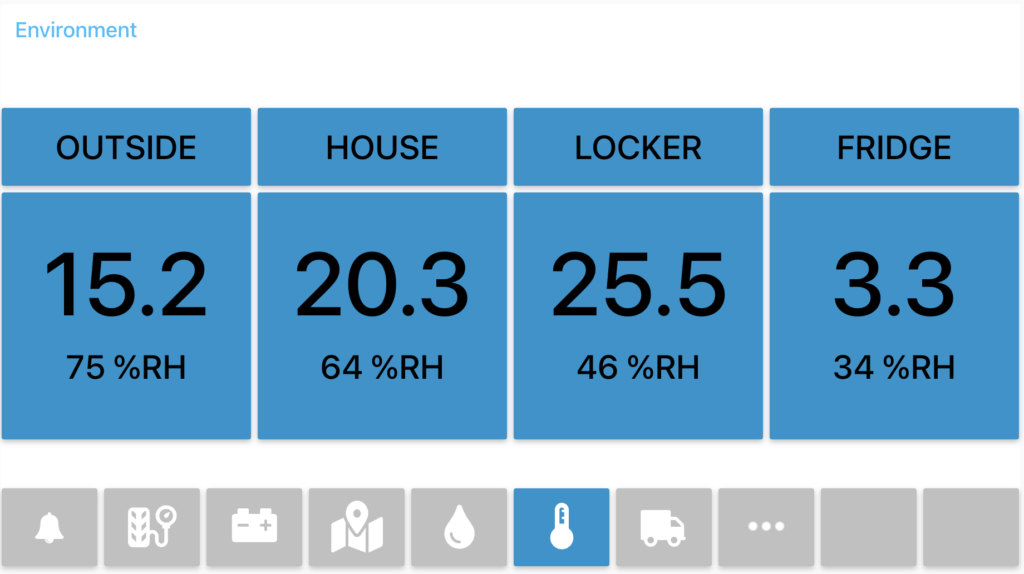
Once the Raspberry Pi was reading the bluetooth messages reliably, it was very easy to write some node-red code to process the incoming mqtt messages. Temperature and relative humidity is extracted from the messages and displayed onto a node-red dashboard. There is some code to make sure updates are being received, and to generate an alert if the system stops working correctly.
We are currently monitoring the outside, house, fridge and the freezer. Later we will add 2 more sensors to monitor the battery box and the rear storage locker. Just need to buy the sensors and add them to the system.